Equipment Maintenance
Slush Machine Maintenance
Here at SlushCo we place huge importance on cleaning your slush machine, ensuring that you get the maximum life out of your investment. When you buy a slush machine from SlushCo, full cleaning instructions will be provided but the instructions below apply to all slush machines.
Cleaning Requirement Summary
❆ Wash and Rinse – Weekly
❆ Seals Lubrication – Weekly
❆ Condenser Clean – Weekly – For the new Freazy model, every 12 weeks
❆ Wear and Tear – Replace the 3 seals annually (rear tank seal, drive shaft seal and tap seal
A full clean down, sanitisation and seal lubrication of your slush machine should be carried out every week, or every 500 drinks – whichever is the soonest.
The quality of the slush syrup used is also important. Sugar is the key ingredient in quality slush syrup as it’s the sugar that acts as the antifreeze on the freezing barrel. If you are tempted to purchase so called ‘cheap’ slush syrup, you run the risk of causing damage to your slush machine by placing duress on the motor gearbox due to the sugar content being lower.
Cleaning Instructions;
1. Turn the slush machine freeze/refrigeration switch to the off position
2. Drain out any remaining slush
3. Fill your slush machine with clean, lukewarm water and a suitable mild detergent
4. After 15 minutes, drain and discard the water, then repeat step 3 with fresh water
Disassembling the slush machine to lubricate parts;
5. Turn the agitator switch to the off position and turn off the main power switch and unplug the slush machine from the power socket
6. Remove the tank lids and wipe clean with warm, soapy water. Do NOT immerse the tank lids in water
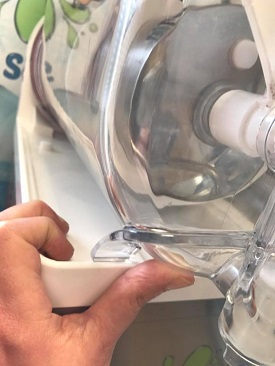
7. Remove the tank by gently lifting the front then carefully sliding free from rear
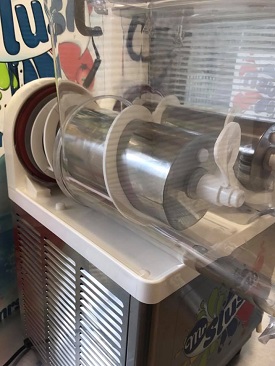
8. Once the tank is free, slide off the plastic spiral agitator/spindles from the cooling cylinder
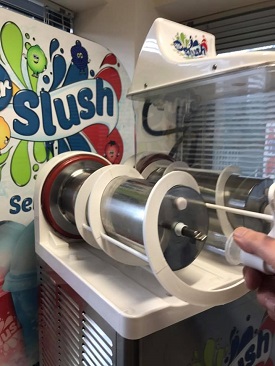
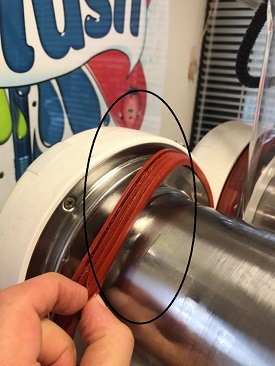
9. Remove the large round seal at the rear of the slush barrel and soft seal on the drive shaft
10. With a mild detergent and warm water, wipe all of the machine surfaces down
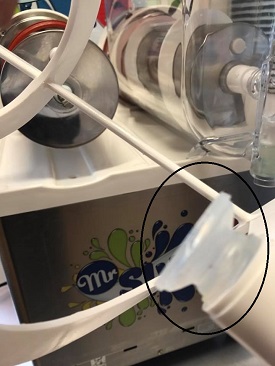
11. Remove the tap assembly by pulling out the locking pin and remove the O-ring/plunger and/or seal from the draw handle valve
12. Wash all parts in warm water and detergent (available from SlushCo), rinse and allow to air dry

Re-assembling your slush machine;
1. Lubricate the O-rings, seals and plunger with food safe petroleum grease (available from SlushCo)
2. Insert the draw valve assembly into the bowl and hold in place with the tap handle and secure the handle with the locking pin
3. Lubricate the inside of the soft seal and slide it into position on the slush machine drive shaft
4. Place the large round seal on the rear of the cooling system
5. Lightly lubricate the silver bush located in the front of the bowl
6. Lightly lubricate the outside of the silicone seal on the drive shaft
7. Slide the agitator/spindle onto the freeze cooling cylinder
8. Slide the bowl/tank cover over the agitator and align it with the large rear seal at the back of the freezing cylinder
9. Align the agitator with the silver bush in the front of the bowl by lifting the agitator whilst sliding the bowl into position
10. Ensure the bowl is set in position with the slot in the front sides of the bowl’s base, locked over the machine edge
Your slush machine is now ready for use.
The Compressor
The compressor is a major component of the slush machine and also one of the most expensive components to replace. Damage can be caused by the compressor overheating. To avoid this from happening, make sure the machine is positioned in a well ventilated area. Allow at least a 15cm space all around the machine. Never allow the vents on the machine to be obstructed.
The Condenser
The condenser can be accessed inside the side panel (which is easily removed). It collects dust and grease from the fans and if not cleared can cause problems such as stopping your solution freezing.
To clean (which allows air to circulate), remove the side panel and brush through with a soft brush. A vacuum hose can also be used.
Night Mode
Sencotel machines have 2 temperature settings ‘I’ which is freeze mode, ‘II’ which is chilled drinks and night mode. At the end of the please, switch the switch from freeze ‘I’ to chilled ‘II’. The machines are designed to rotate 24/7. This will allow the ice to defrost gently and retain the mix in a chilled state overnight.
Failure to use the night mode setting may result in the ice not defrosting properly so if you turn the machine on in the morning, the mixing spindle may break.
Troubleshooting
Machine leaking
This is the most issue customers experience and simple to resolve. Most leaks will be resolved with good cleaning practices. Dirt and grime build up is the most likely cause.
- ❆ Make sure the rubber bungs and seals are not damaged and fitted correctly
- ❆ Clean and lubricate the 3 seals weekly. This will remove grime and create an water-tight seal
- ❆ Replace all the rubber seals with new ones once a year.
Slush mix not freezing
The most likely cause is dust and dirt building up in the condenser, which is positioned on the left hand side.
- ❆ Make sure the syrup to water ratio is correct
- ❆ Airflow – The machine needs 15cm of clear space at each side and the back
- ❆ Condenser – Must be cleaned every 2 weeks. If a layer of dust/debris is present, this will stop the airflow so will not freeze the mix
Clicking or knocking noise
❆ This is perfectly normal, especially when the machine is brand new. As the thermometer constantly adjusts, it will click, particularly during freeze up or freeze down time. The noise will lessen over time as your machine beds in.
Troubleshooting Guide – Common Slush Machine Issues & Fixes
Even well-maintained slush machines can occasionally need troubleshooting. This guide will help you quickly identify common issues, understand likely causes and apply practical fixes — keeping downtime low and drinks flowing.
💧 1. Leaks Around Tanks or Seals
Symptoms: Liquid dripping from taps, rear tanks or sitting beneath the machine.
Common Causes:
-
Loose or worn seals/gaskets
-
Tap seals not in placed correctly
-
Residue build-up interfering with valve closure
How to Fix:
-
Inspect all the seals: tap seal, rear tank gasket seal and shaft seal
- Clean and lubricate the seals weekly
-
Replace any worn parts as needed
Maintenance Tip: Replace seals annually to maintain optimal performance.
❄️ 2. Slush Machine Not Freezing
Symptoms: Machine runs but mix doesn’t freeze properly; liquid remains too soft.
Common Causes:
-
Blocked airflow due to dust or obstruction around vents
-
Incorrect syrup-to-water ratio
-
Machine placed in a hot or poorly ventilated area
-
Condenser buildup preventing effective cooling
- Solenoid valve failure
How to Fix:
-
Ensure at least 15 cm of clearance around the machine for airflow
-
Clean vents and condenser with a soft brush or vacuum weekly
-
Check the mix ratio — aim for manufacturer’s recommended dilution
-
Move the machine to a cooler, well-ventilated spot
- Check the temperature display readings. If tank temps range from -1 to -4, this is normal and the above actions will resolve. If the readings are room temperature, this suggests a faulty solenoid valve
Pro Tip: If freezing intermittently, check that the ambient room temperature isn’t too high — extreme heat can reduce cooling efficiency.
🔁 3. Agitator Not Rotating
Symptoms: Slush freezes solid in tank, spiral not moving, unusual motor noise.
Common Causes:
-
Snapped or damaged plastic spiral (auger)
-
Broken or worn drive shaft
-
Faulty gear motor
-
Obstruction inside tank
How to Check:
-
Turn off and unplug the machine.
-
Empty the slush tank and remove.
-
Slide off and inspect the spiral for cracks or snapping.
-
Check if the drive shaft steel rod is rotation
Solution:
-
Replace snapped spiral or damaged drive components.
-
If the motor hums but does not turn, the gear motor may need replacing.
-
Contact technical support if unsure.
⚠️ Running a machine with a non-rotating agitator can cause the mix to freeze solid and may damage internal components.
❄️ 4. Slush Is Too Hard or Crystalline
Symptoms: Slush is icy, solid or difficult to dispense.
Common Causes:
-
Too much freezing; low syrup level in tanks
- Incorrect ratio
How to Fix:
- Fill slush tanks at least half full
-
Rebalance your mix with a slightly higher syrup ratio
-
Use fresh syrup and ensure it’s mixed thoroughly
Quick Test: A well-balanced slush should be thick yet pourable and easily dispensed.
🌀 5. Agitator (spindal) not rotating
Symptoms: Liquid dripping from taps or sitting beneath the machine.
Common Causes:
-
Loose or worn seals/gaskets
-
Taps not fully seated or tightened
-
Residue build-up interfering with valve closure
How to Fix:
-
Clean and inspect all seals, gaskets and O-rings
-
Replace any worn parts as needed
-
Ensure the draw valve is fully reassembled and tight
Maintenance Tip: Replace seals annually to maintain optimal performance.
🔊 6. Strange Noises During Operation
Sounds: Clicking, knocking, humming or gurgling.
Common Causes:
-
Normal compressor cycling (especially in warm conditions)
-
Congested condenser or fan airflow
-
Low refrigerant (rare in newer machines)
How to Fix:
-
Confirm the noise is a regular cycling sound — this is normal
-
Clean the condenser region and ensure airflow isn’t blocked
-
If noises persist, contact a certified technician
Note: Knocking when freezing starts or stops is often due to thermal expansion; this is standard and not harmful.
☀️ 7. Machine Overheating
Symptoms: Machine feels extremely hot; trips breakers or stops intermittently.
Common Causes:
-
Restricted airflow around the condenser
-
Placed too close to walls or other heat sources
-
Faulty internal fan
How to Fix:
-
Keep machines at least 15–20 cm from walls
-
Avoid placing near ovens or direct sunlight
-
Check fan operation and clean vents
🛠 Maintenance & Troubleshooting Best Practices
-
Weekly Clean: Always clean tanks, lids, agitators and drip trays
-
Condenser Care: Remove dust and debris regularly
-
Seal Check: Inspect and lubricate seals each month
-
Placement: Ensure the machine has plenty of space for air circulation
-
Record Keeping: Maintain a service log for parts replaced and cleaning done
📞 When to Call Support
If basic troubleshooting doesn’t resolve the issue, or if the problem is electrical, refrigerant-related, or persistent, contact us immediately. Professional service and on-site support ensures your slush machine continues delivering quality drinks with minimal disruption.